
Appearance
Live shows: preview, takes and the T-bar
Everything you need to run visuals for a crowd: prepare the next look without the audience seeing, bring it in exactly how and when you want, and keep the controls out of the way.
A typical setup: your laptop runs the controls, and one or more output windows show the visuals on projectors or screens.
Preview mode
Turn it on with PVW at the top of the panel, the switch in the Outputs tab, or Tab. It works like a vision mixer:
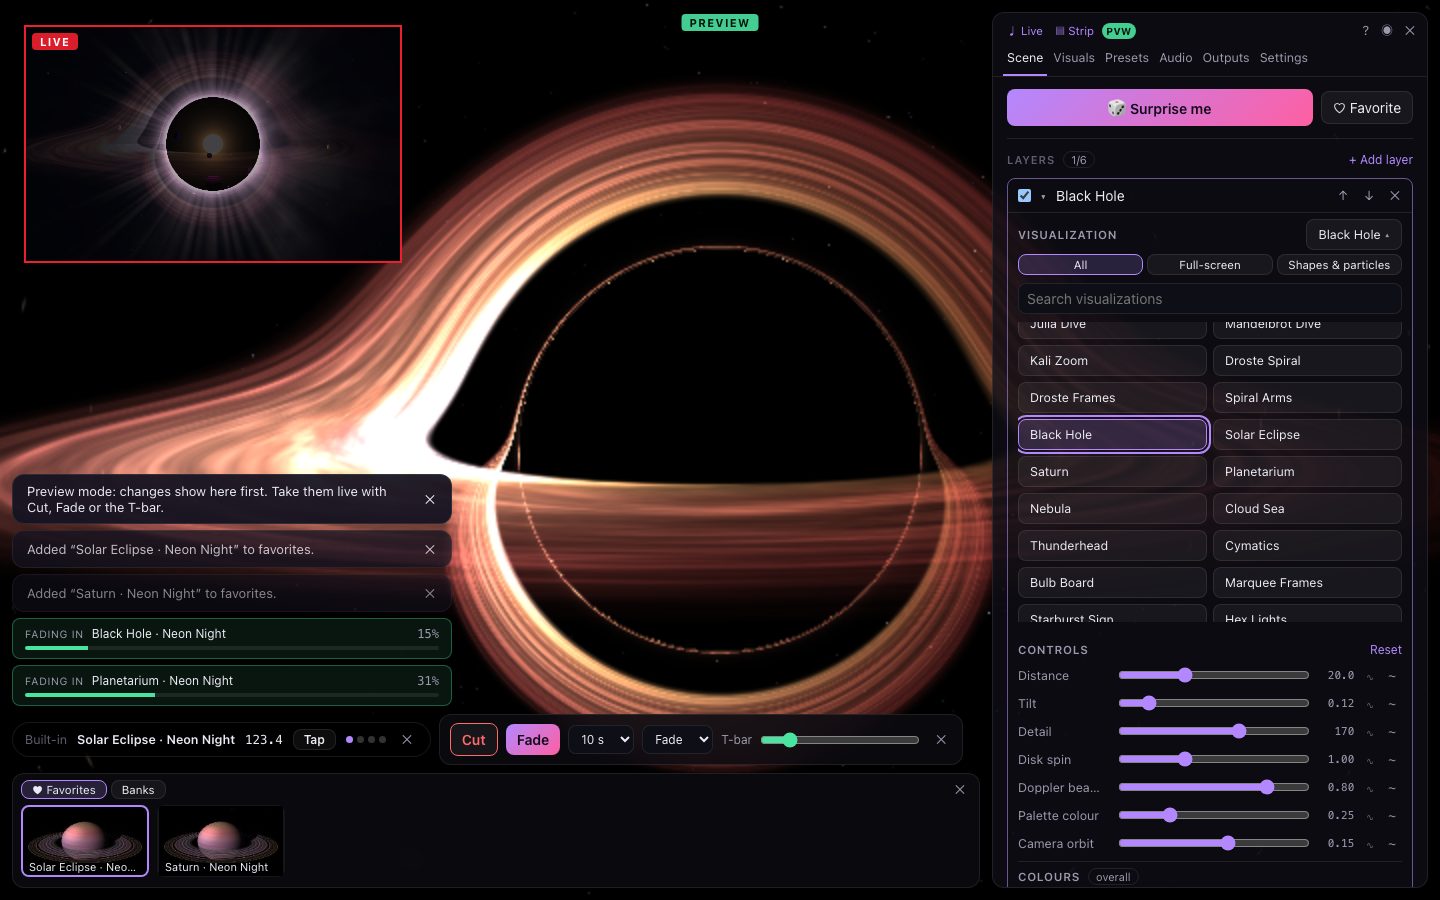
- The main window becomes the preview. Anything you change — layers, visualizations, colours, presets — appears here first. A PREVIEW badge marks it.
- The screens stay live. Output windows keep showing what's live, and so does a monitor in the top-left corner of the main window, framed in red and labelled LIVE.
- When you're ready, take the preview live.
Recording, blackout and the flash limiter act on what's live. Auto-pilot and auto-cycle pause while preview mode is on. Turning preview mode off takes the newest fading look live and goes back to editing what's live directly; anything prepared but not taken can be brought back with undo.
Takes
The switcher appears in the bottom dock:
| Control | Key | What it does |
|---|---|---|
| Cut | ⇧ Space or ⇧ Enter | The preview goes live instantly, over anything that's fading. |
| Fade | Space or Enter | The preview fades in over the chosen time. |
| Time menu | 0.5 to 10 seconds. | |
| Style menu | Fade, wipe, zoom or luma. | |
| T-bar | Mix by hand from live to the preview. |
In preview mode, Space and Enter work even when a button, slider or menu has focus, so you never have to click away first. (Typing in a text field still types.)
The moment a take starts, it's locked in
When you press Fade (or start moving the T-bar), the look you've prepared is locked in and fades in exactly as it was. Keep editing straight away: your changes build the next preview, not the one on its way to the screens.
Fades can overlap
Press Fade again while a fade is still running and the new look starts fading in at the same time, layered over the first. Each runs on its own timer. When one reaches 100% it's live, and anything older underneath it is dropped. Long fades stacked on each other make slow, layered blends.
Every running take is listed in the notices with its progress: green while it runs on its own, red while you hold it.
The T-bar
The T-bar always follows the newest take:
- During a fade it moves by itself (green), showing the progress.
- Grab it mid-fade to take over: the fade stops where it is, under your hand (red). Drag from there.
- Fade resumes it: while the T-bar holds a take part-way, the Fade button reads Resume. Press it (or Space) to carry on from that point at the chosen speed.
- At the top, the take is complete when you let go or move the mouse off the bar. The bar returns to 0, ready for the next one.
- Back at the bottom, the take is dropped and nothing changes on the screens.
Without a fade running, just drag the T-bar to mix the preview in by hand.
Performance mode
Press M or for a clean stage: the control panel hides and the Live pane appears. In fullscreen, Esc and Tab are kept for the visualizer instead of the browser.
- To leave, press Esc twice — a single stray Escape mid-show does nothing — or click exit in the Live pane.
- While performing, or with output windows open, closing or reloading the tab asks for confirmation first.
The Live pane
Your at-a-glance status: bank and preset, tempo, time signature, a Tap button, the beat within the bar, an Auto/Hold button for beat detection, and chips for auto-pilot, recording, blackout and freeze. Show or hide it with K or Live, in any mode.
Blackout and freeze
| Key | What it does |
|---|---|
| B | Blackout: fade the screens to black (and back). |
| G | Freeze: hold the current frame. |
A show workflow
- Before the show, build your looks and save them to banks or favorites.
- Open output windows on the projectors, then turn on preview mode.
- Show the strip (J) and the Live pane (K).
- During the show: click a look in the strip (it loads into the preview), tweak it, and press Space on the beat to fade it in — or ⇧ Space on a drop to cut.
- Keep safe mode on for audiences.